Stereoscopic Multiplexer User Guide
Content
Stereoscopic Multiplexer Configuration
Since versions 0.5, Stereoscopic Multiplexer includes an easy-to-use configuration
tool. Its wizard allows you to configure the Stereoscopic Multiplexer with a few
clicks. If you are still using an older version, we strongly recommend to
upgrade. The upgrade is free for registered
users of all previous versions. To enter your product key, click Help>Enter Product
Key in the Stereoscopic Multiplexer Configurator. The unregistered version is
fully functional, but will watermark all captured content.
First of all, make sure that both capture devices (cameras, capture cards, ...)
are ready for operation.
 |
 |
| |
| ► |
When using DV devices, it is necessary to connect
them to separate Firewire controllers. Using two jacks on the same controller
does not work! |
| ► |
If you use Firewire
webcams or industrial cameras according to the 1394 Trade Association's
Digital Camera Specification, it depends on the resolution and frame
rate whether two controllers are necessary or not. Click here for an overview
of
bandwidth requirements for different video modes. |
| ► |
USB 2.0 cameras also require separate USB 2.0 controller,
depending on the resolution and frame rate. Some cameras require separate
controllers even at lowest resolutions. |
|
|
 |
 |
 |
Click Start>All Programs>Stereoscopic Multiplexer>Stereoscopic Multiplexer
to run the Stereoscopic Multiplexer Configurator. If you are using the Stereoscopic
Multiplexer for the first time, it will open the configuration wizard automatically,
else click Driver>Configuration Wizard.
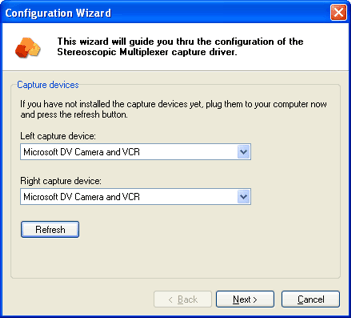
Select left and right capture device and click Next. Make sure you do
not select the same item as left and right capture device (because their names are
usually the same). If your devices do not show up, make sure that
- they are connected to the PC
- they are turned on
- their drivers are installed

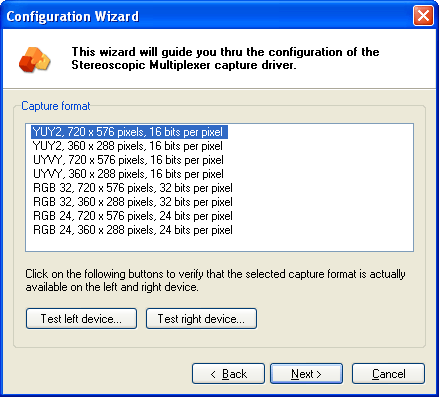
The list of capture formats includes only items which are actually available
on both capture devices. If the Stereoscopic Multiplexer Configurator cannot find
any compatible format, it will still offer RGB 32 at the left device's default resolution.
It is very likely that there is a decoder available which converts the unsupported
format to RGB 32, so that in such cases the suggested format will work as well.
Click the Test left device and the Test right device buttons to
test the devices using the selected format. In case left and right devices work
one at a time but do not work simultaneously, make sure your connected the cameras
to separate controller (see important information box above). You can also try a
lower resolution or to continue to the next step and select a lower frame rate.
However, there is no guarantee that the cameras will work all, even when using separate
controllers. Some capture drivers are faulty and unable to handle two devices. Contact
the manufacturer and ask for an updated driver.
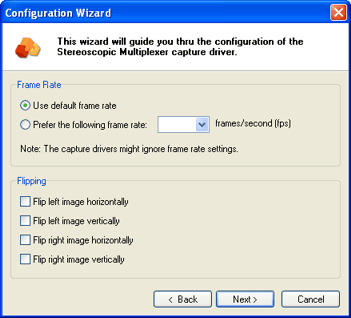
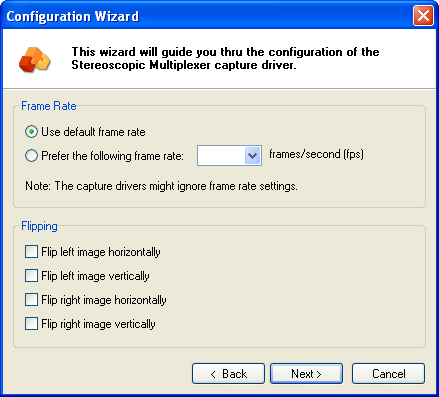
In the third step, you can select a custom frame rate, flip the images or rotate
them by 180° (= flipping horizontally and vertically). Flipping is performed in
software and works with all kind of capture devices. The chosen frame rate, however,
must be supported by the capture device. If you select and unsupported frame rate,
the devices either use the closest supported frame rate, the default frame rate
or do not work at all. The frame rate options are unavailable if the capture devices
support a fixed frame rate only, e.g. DV devices.
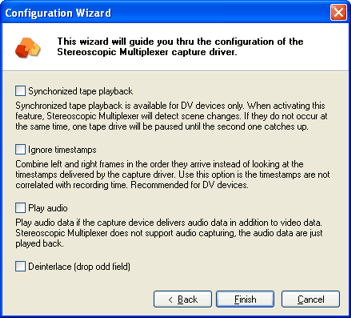
The last step allows you to set a few options:
- Synchronized tape playback: More details on
DV tape synchronization are available
here.
- Ignore timestamps: Capture drivers set a timestamp on each frame.
By default, Stereoscopic Multiplexer uses these timestamps to synchronize left
and right video stream. However, timestamps are set by the driver, not by the
camera so they do not correspond to recording time necessarily. With some capture
devices, Stereoscopic Multiplexer achieves better results by ignoring the timestamps,
combining left and right frames in the order they arrive. This applies to DV devices
and some webcams.
- Play audio: Some capture devices deliver both video and audio
data. Enable this option to pass audio data from the left capture devices to the
sound card. Please note that Stereoscopic Multiplexer doesn't allow to capture
audio. The audio data are directly sent to the sound card but are not made available
to the capture application. Use Play audio to enable sound when watching
video tapes. Usually, this option is set together with Synchronized tape playback.
- Deinterlace: Enable this option to perform simple deinterlacing.
It removes weave artifacts from the video image by dropping every second line
of each frame. The Stereoscopic Multiplexer output delivers half vertical
video resolution.
Finally, click Finish. The Stereoscopic Multiplexer will be loaded and
you should see left and right image in side-by-side format (right image on the left
side for cross-eyed viewing).
Using the Stereoscopic Multiplexer Configurator
The Stereoscopic Multiplexer Configurator provides the following functionality:
- Configuration of the Stereoscopic Multiplexer: See the previous
chapter for more details.
- Testing the Stereoscopic Multiplexer: Click Driver>Load
to load the Stereoscopic Multiplexer and Driver>Unload to unload it. Loading
will fail if the left or right capture device is in use by another application.
Use Driver>Format Properties and Driver>Device Properties to access
the Stereoscopic Multiplexer configuration dialogs. These dialogs can be accessed
from other capture tools as well. See the documentation of these tools how to
open the capture device settings (the Stereoscopic Multiplexer acts as capture
device from the application's point of view).
- Installing and uninstalling the Stereoscopic Multiplexer: Stereoscopic
Multiplexer is a capture driver available to all applications on your system.
If an application attempts to load it while it is not configured properly, an
error message will be shown. Driver>Uninstall allows you to temporarily
disable the Stereoscopic Multiplexer. It remains on the hard disk but is not visible
for other applications anymore. To activate it again, click Driver>Install.
The Stereoscopic Multiplexer Configurator is a configuration tool only. It doesn't
support capturing to hard disk (yet). We recommend to use the
Windows Media Encoder for compressed capturing or live broadcasts or Microsoft
AMCap for
high quality uncompressed capturing. Both tools are available for free.
Stereoscopic Multiplexer and Stereoscopic Player
Stereoscopic Player is the ideal application to convert Stereoscopic Multiplexer's
side-by-side output to any other commonly used stereoscopic format on-the-fly. Make
sure you have the latest player version
installed.
In Stereoscopic Player, click File>Live Video>Stereoscopic Multiplexer
to load the Stereoscopic Multiplexer. Click File>Layout>Side By Side, Right Image
First and select the proper aspect ratio in File>Aspect Ratio. Usually,
the default aspect ratio will be ok, but if your camcorders are set to 16:9 mode,
it must be set to 19:6. In case you use special capture hardware, custom aspect
ratios are possible as well.
Select one of the stereoscopic viewing method (= player output format) from
View>Viewing Methods.
Stereoscopic Multiplexer Driver Settings
Stereoscopic Multiplexer acts as a WDM capture driver and consequently has two
configuration dialogs:
- Format settings
- Device settings
Most capture applications allow you to access these dialogs. The format settings
are often called capture pin settings as well. In Stereoscopic Player, click
File>Device Properties and File>Format Properties, in Stereoscopic
Multiplexer Configurator, the same items are available in the Driver menu.
The following screenshot shows the format settings dialog, which consists
of the Source and About tabs. The About tab doesn't expose
any configuration options so we will not discuss it here.
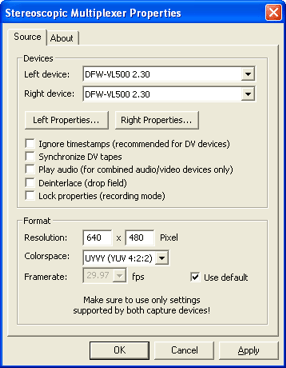
All of the options (except Lock properties) can be selected in the Stereoscopic
Multiplexer Configurator's configuration wizard as well (see first chapter). However,
this dialog provides more flexibility: It allows experienced users to try settings
which cannot be selected in the configuration wizard but doesn't prevent you from
choosing invalid settings. We recommend to use the Stereoscopic Multiplexer Configurator
to select the capture devices and the capture format. Change the settings in this
dialog only if there are strong reasons to do so.
If you set an invalid configuration, the Stereoscopic Multiplexer cannot be loaded
anymore in most capture application, so the configuration dialog will be inaccessible.
In such a case run the Stereoscopic Multiplexer Configurator's configuration wizard
again. (Experienced users can fix the problem using GraphEdit as well.)
Ignore timestamps, Synchronize DV tapes, Play audio and
Deinterlace are explained in the first chapter. Lock properties is
explained below. Stereoscopic Multiplexer supports the following color spaces.
- YUY2 (YUV 4:2:2)
- UYVY (YUV 4:2:2)
- RGB 32 (RGB, 32 bits per pixel)
- RGB 24 (RGB, 24 bits per pixel)
Prefer color spaces which are natively supported by the capture devices, if there
are more of them, prefer the one listed top (for performance reasons). If non of
the capture device's color spaces are supported by Stereoscopic Multiplexer, try
RGB 32 or RGB 24. A video decoder will be used to convert the capture device format
to RGB.
Usually, it's not necessary to enter a frame rate, Use default should
work in any case. Enter a frame rate manually to force a frame rate which differs
from the default (provided that the capture device supports this frame rate).
The error message 'Stereoscopic Multiplexer could not connect to the left/right
device! Maybe the device doesn't support the selected format.' indicates that
the selected format or frame rate is unsupported and that no suitable decoder has
been found.
Configuration hints:
- The proper settings for DV devices are 720 x 576 pixel (PAL) or 720 x 480
pixel (NTSC). The recommended color space is YUY2.
- Typical webcam resolutions are 640 x 480 and 320 x 240, the color space depends
on the camera (RGB 32 or RGB 24 are usually supported).
The device properties dialog has four additional tabs. The Source
tab is available as well, but most controls are likely to be be disabled because
the format cannot be changed while the Stereoscopic Multiplexer is in use.
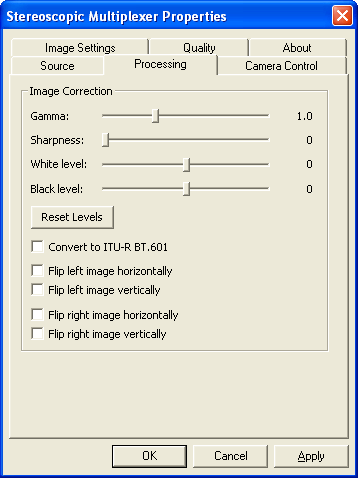
Processing: All functions offered on this tab are implemented in
the Stereoscopic Multiplexer, so activating them consumes additional CPU power.
Gamma, Sharpness, White level, Black level and Convert
to ITU-R BT.601 are only available if the YUY2 or UYVY color space is being
used. Convert to ITU-R BT.601 must be checked if the cameras deliver image
data with luminance and chrominance values in the range between 0 to 255 instead
of 16 to 235 (luminance) and 16 to 240 (chrominance). For example, this applies
to the Sony DFW-VL500 cameras we use (and probably other cameras from the DFW series,
too). The flipping options allow to flip both left and right image horizontally
and vertically.
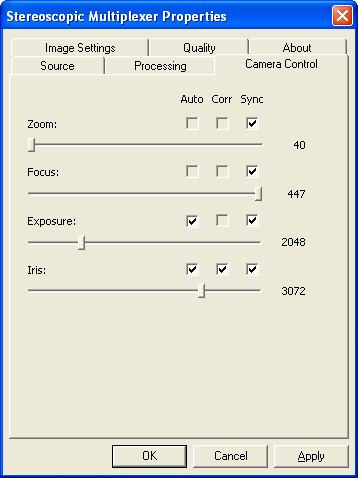
Camera Control, Image Settings: These tab allow to adjust camera
properties. It depends on your camera's features which properties are actually available.
The pages are being hidden if none of the properties are supported. When adjusting
the value, it is set on both cameras. Stereoscopic Multiplexer periodically checks
if the left or right value has changed and copies it to the other camera (parameter
synchronization). Checking the Auto option lets the camera choose this property
automatically. The auto mode is only set on the left camera and the current value
periodically copied to the right camera. If left and right values should not be
synchronized, uncheck the Sync option. Lock properties on the Source
tab temporarily sets all properties from automatic to manual mode and disables parameter
synchronization. Use it to avoid property changes during recording.
Sometimes, left and right images look different although the same property values
were used on both cameras due to different calibration after production. In this
case it is possible to apply correction functions to each property (contact us for
more details). If a correction function has been defined, you can uncheck Corr
to temporarily disable it.
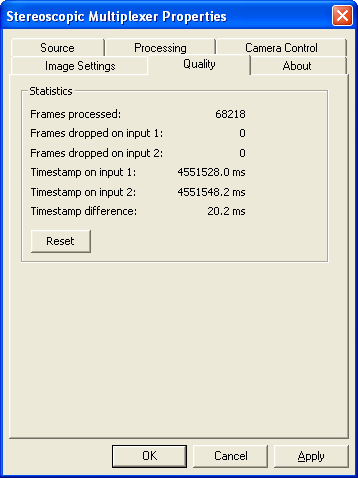
Quality: Displays number of processed and dropped frames as well
as current time stamps.
Simultaneous Recording & Preview
Stereoscopic Player and Stereoscopic Multiplexer Configurator do not allow to
record the video, whereas capture application do not offer a stereoscopic preview.
Using GraphEdit, it is possible to get both. First you have to download and
install some additional components:
- GraphEdit: Part of the
DirectX SDK, either February 2005 version + extras or older version.
- Stereoscopic Player: Download the latest version
here.
- Video Codec: We will use the
PICVideo MJPEG
Compressor in this sample, but any other compressor capable of real-time encoding
works, too. For best quality, we recommend the lossless
Huffyuv codec, however, you'll need a fast hard disc or RAID array for high
resolutions or frame rates.
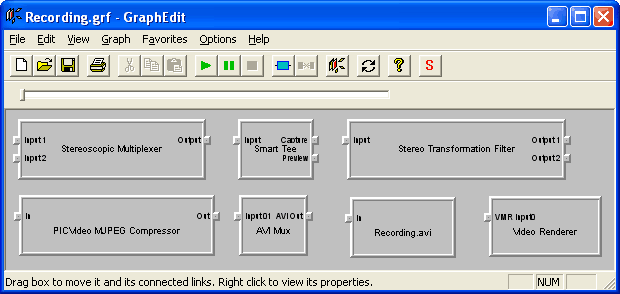
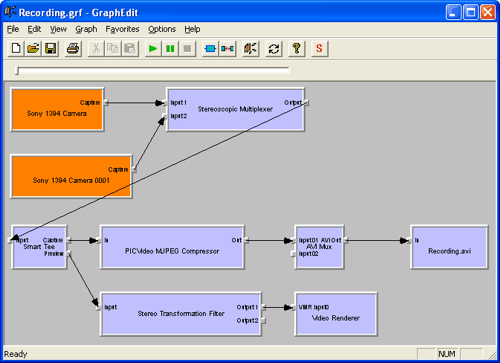
Run GraphEdit and insert all necessary filters (Graph>Insert Filter) as
shown in the following screenshot. The filter named Recording.avi is a
File Writer filter.
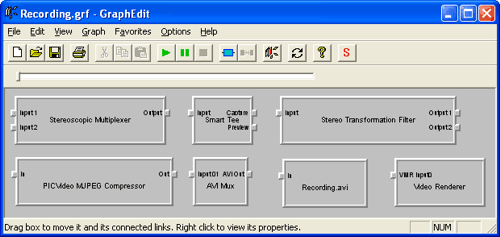
Right-click on a filter and choose Filter Properties to open the filter's
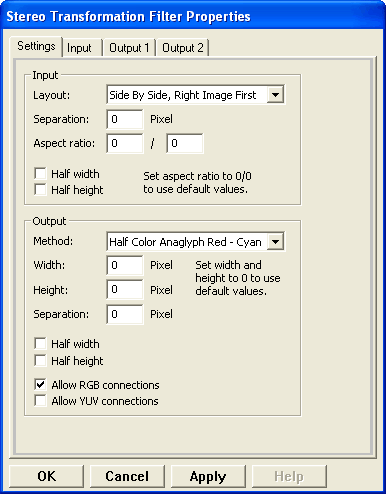
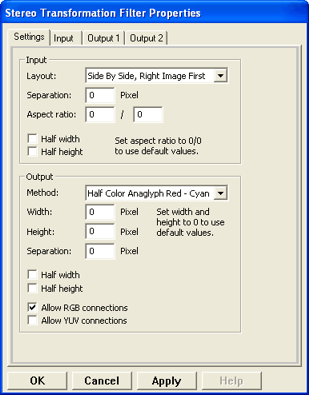
configuration dialog. Configure the Stereoscopic Multiplexer as described above,
then configure the Stereo Transformation Filter: Select Side by Side,
Right Image First and your preferred output method. If you choose an anaglyph
method, you should disable Allow YUV connections to obtain best image quality
(YUV mode uses 4:2:2 color subsampling). If you choose NVIDIA Stereo Driver,
Quad Buffered OpenGL or an interlaced viewing method, you have to insert
the NVIDIA Stereo Renderer, OpenGL Stereo Renderer or DirectX Stereo
Renderer instead of the Video Renderer. Dual Output and Dual
Output, StereoBright require the Stereo Transformation Filter's second output
to be connected to an additional Video Renderer.
Next, configure the video compressor you have inserted. If you have chosen a
Video for Windows codec, it's not possible to configure the codec within GraphEdit.
If you connect an audio capture device to the second AVI Mux input, you have
to configure the AVI Mux to use recording mode. It also displays the dropped
frames count. After you have configured all filters, connect them as shown below.
Connect the Stereoscopic Multiplexer first and then the other filters in
downstream order. When you connect the Stereoscopic Multiplexer, it will
automatically insert the two capture devices and connect its inputs.
Make sure Graph->Use Clock is checked. Use Graph->Play to run the
graph.
|